Setting up classes
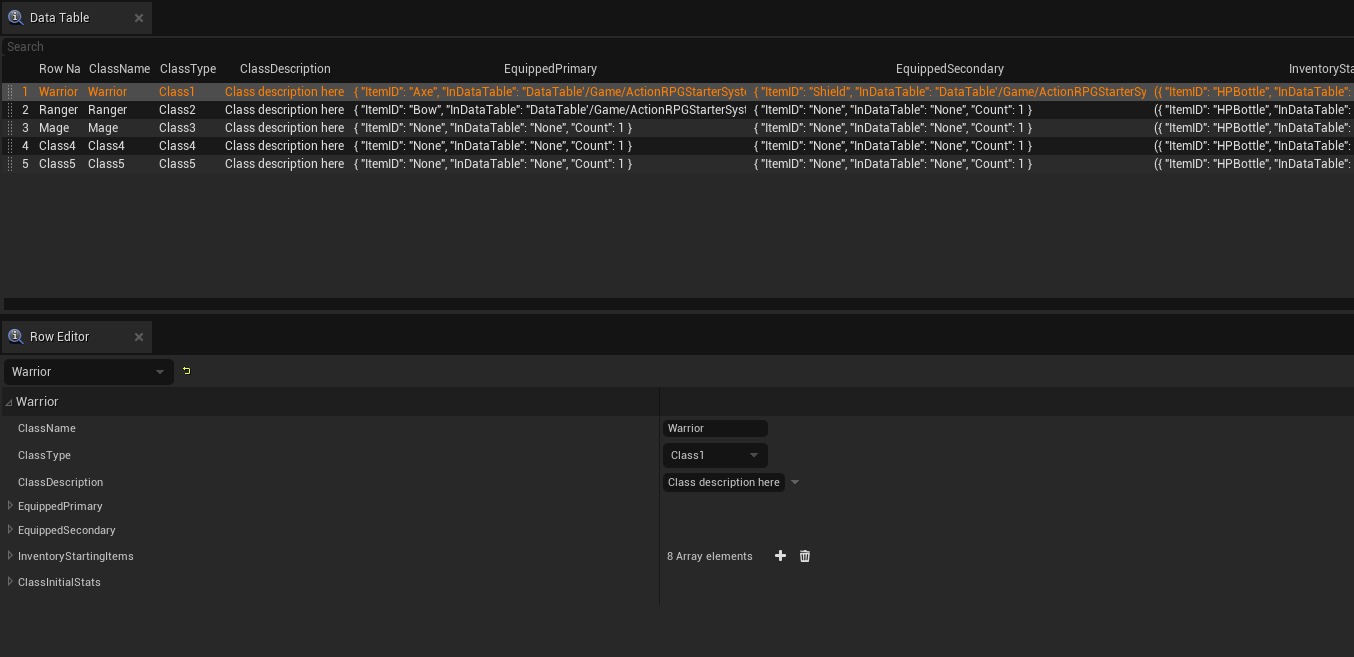
We can setup what stats each class has and what starting items a certain class gets. In order to do that open DT_ClassSetups data table it should be in Character/Blueprints/Lobby/ClassSetups in here you can setup your classes however you want by indicating their stats, inventory starting items etc
Setting up Character Blueprint Class by Race and Gender
Navigate to Character>Blueprints>Lobby>ClassSetups and open DT_RaceSetup data table, inside we have 5 race examples setup, you can see in the CharcaterClassByGender setup we indicate the character class blueprint that should spawn based on Race and gender.

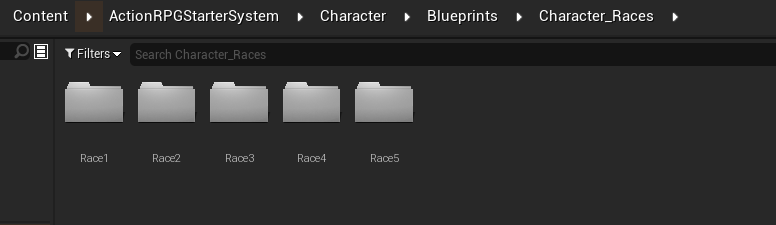
Inside Character_Races folder you will find child classes of BP_ARPG_Character each race folder has 2 child classes representing 2 genders, simply open each child class and modify the skeletal mesh and animation blueprint. These child classes are what we indicated in the DT_RaceSetup data table so you can spawn with a specific blueprint class depending on your race and gender.
As you might already know there are 2 modes, Top down and third person and to select which mode you want to use you can open the BP_ARPG_PlayerController and set it after selecting the inventory component, you can also set the class however you can also use the character creator and load the game with your character class.

Create New Pickups
We use data tables to create and organize pickups, data tables are a great way to modify multiple pickups in one place and we can create as many data tables as we need if you like to organize pickups by category.
Inside InventorySystem folder you will find multiple data tables you can either duplicate one of them and clear its content or use one to create a new pickup.
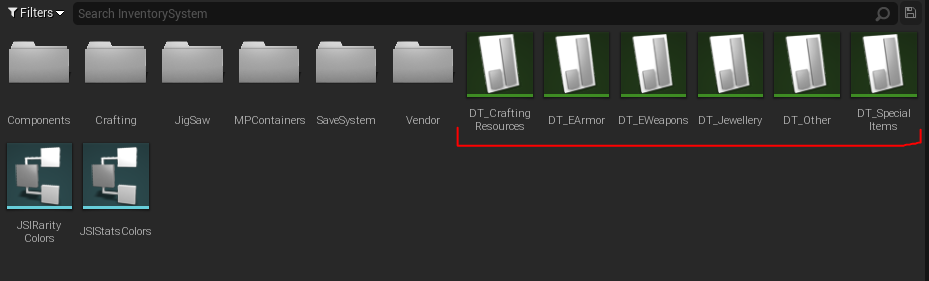
Let’s take a look at how a weapon is created by opening the data table DT_EWeapons.

ItemID: Pick a unique item ID and make sure Row name is the same as ItemID this is very important.
Actor class: This is the pickup version that you pickup off the ground, this is not the blueprint that gets equipped it only servers as something you see on the ground to be picked up, ActorClass is based on BP_MainPickupClass so when creating a new pickup either create a child class based on it or duplicate an existing pickup.
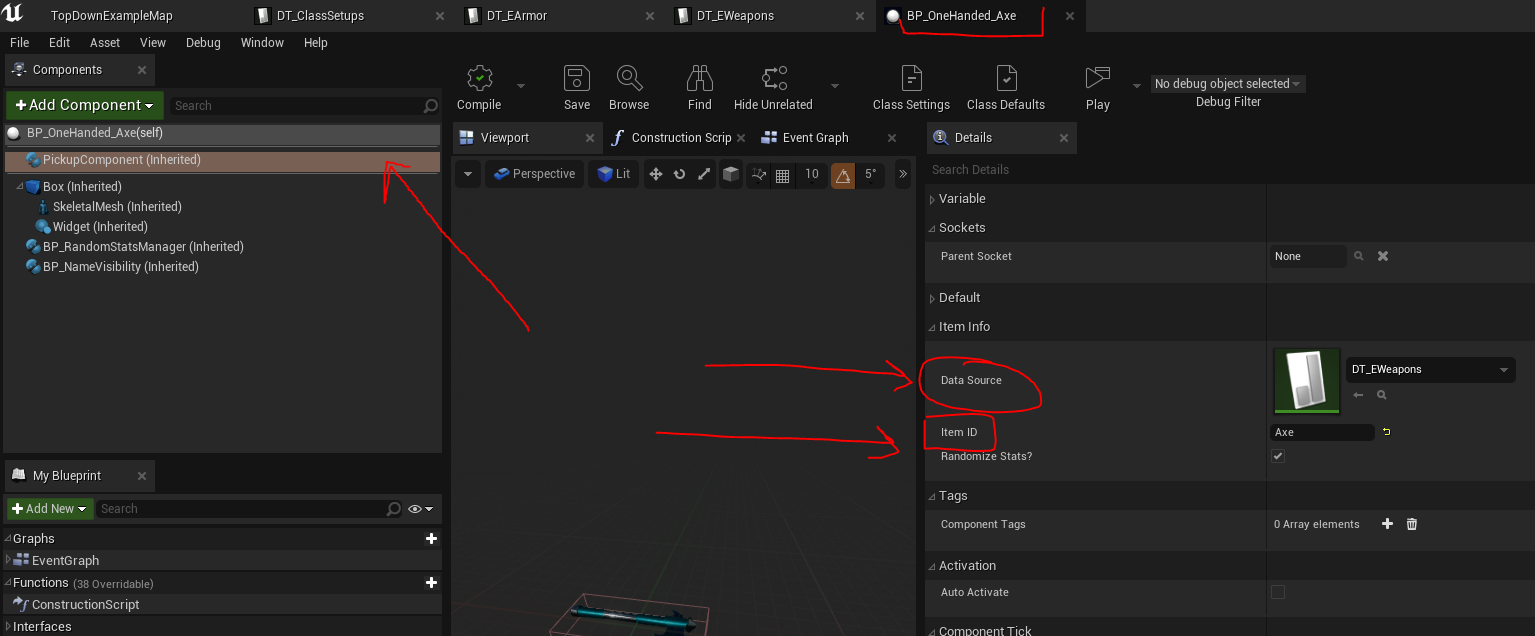
Open your new pickup select the PickupComponent then indicate the data table where the pickup exists and the itemID, for example here we have ItemID = Axe and we indicated the weapon data table, and of course change the visual side of things using the skeletal mesh component, and finally the box extent setting of the Box collision. If your pickup is a static mesh you can create a child class out of BP_MainPickupClass_SM
Type: This depends on if the pickup is an equipment, if the pickup is a weapon that can be equipped to primary and/or secondary then select Primary as the type, Shield for example we indicated Secondary as the type etc If the item is a consumable select consumable. You can always take a look at how we set certain pickups and do the same.
Equipment Type: This is where you set if the item is one handed, two handed or none.
EquipTo: This is where you indicate what slots the item can be equipped to, for example Shield can only be equipped to secondary whereas Axe can be equipped to Primary and secondary.
Supported Classes: Indicate all the classes that can equip the item or set all for all classes.
EquipToMainHandSocket and offhand: Indicate where an item should be attached if it’s an equipment.
EquipmentToEquip: This is the actual blueprint that gets equipped to the character, it is based on BP_MainEquipment this should also work for cloth types.
For the rest of settings it’s straight forward you can take a look at how other pickups are set and learn from it or do the same, we will talk about equipment mods later.
Skill & Abilities
Before talking about setting up the skill tree we need to create Active Skills, these skills are cast by the player to do something such as perform an attack or cast a buff or debuff, passive skills on the other hand can be created inside the skill tree widget itself which makes it easier to support active skills with damage boost and added effects and also added stats to the player.
In order to create active skills we need to open DT_Skills data table inside the Skill folder, there you can see how some skill examples are set up, when adding a new skill make sure ItemID = Row name.
In the skill settings we have a section called AttackSetupByType this is where we indicate what montage is played based on what weapon is equipped, we can indicate multiple montages for certain weapons IDs, take for example the BasicAttack, if we have a hammer equipped a hammer attack is played whereas if we have a bow a bow montage is played instead.
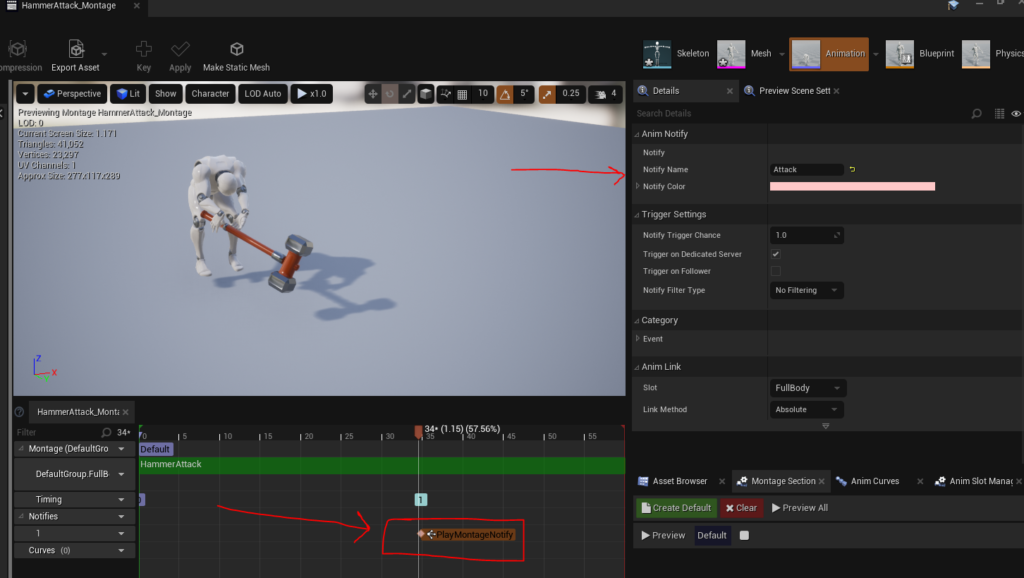
When it comes to the montage played when performing a skill you need to add a montage notify at the moment where the attack should be executed.
SkillToSpawn is the blueprint that should spawn to deal the damage or execute whatever logic is needed, if the skill is a simple buff then no need to spawn a blueprint, take for example Heal we simply indicate the RestoreHealth value.
ApplyEffects this is where you indicate what effects a skill can apply when damaging a target for example we can indicate poison damage, movement slow, this can also be used as a positive buff by indicating AddedStats, you can see how Critical skill is setup. Movement slow is a percentage value it can be negative to slow down movement or positive to boost movement, you can see how Haste skill uses this to increase the players movement speed, and used in SpinAttack to reduce movement speed to targets hit by it.
ApplyOnce is used when you want to apply a certain effect once during a certain duration for example movement slow for 5 seconds, in this case if we leave ApplyOnce false then movement slow will keep being applied based on the interval, interval is used to keep applying something like poison damage but for movement slow we only apply it once.
Let’s take a look at how the spin attack SkillToSpawn is setup, this is the blueprint that is spawned after casting a skill if indicated, this can also be spawned by AI as well. It is not replicated by default so if you need the skill to replicate for example if the attack needs to be visible to everyone like the Orb attack you can enable replicated and replicate movement if needed.
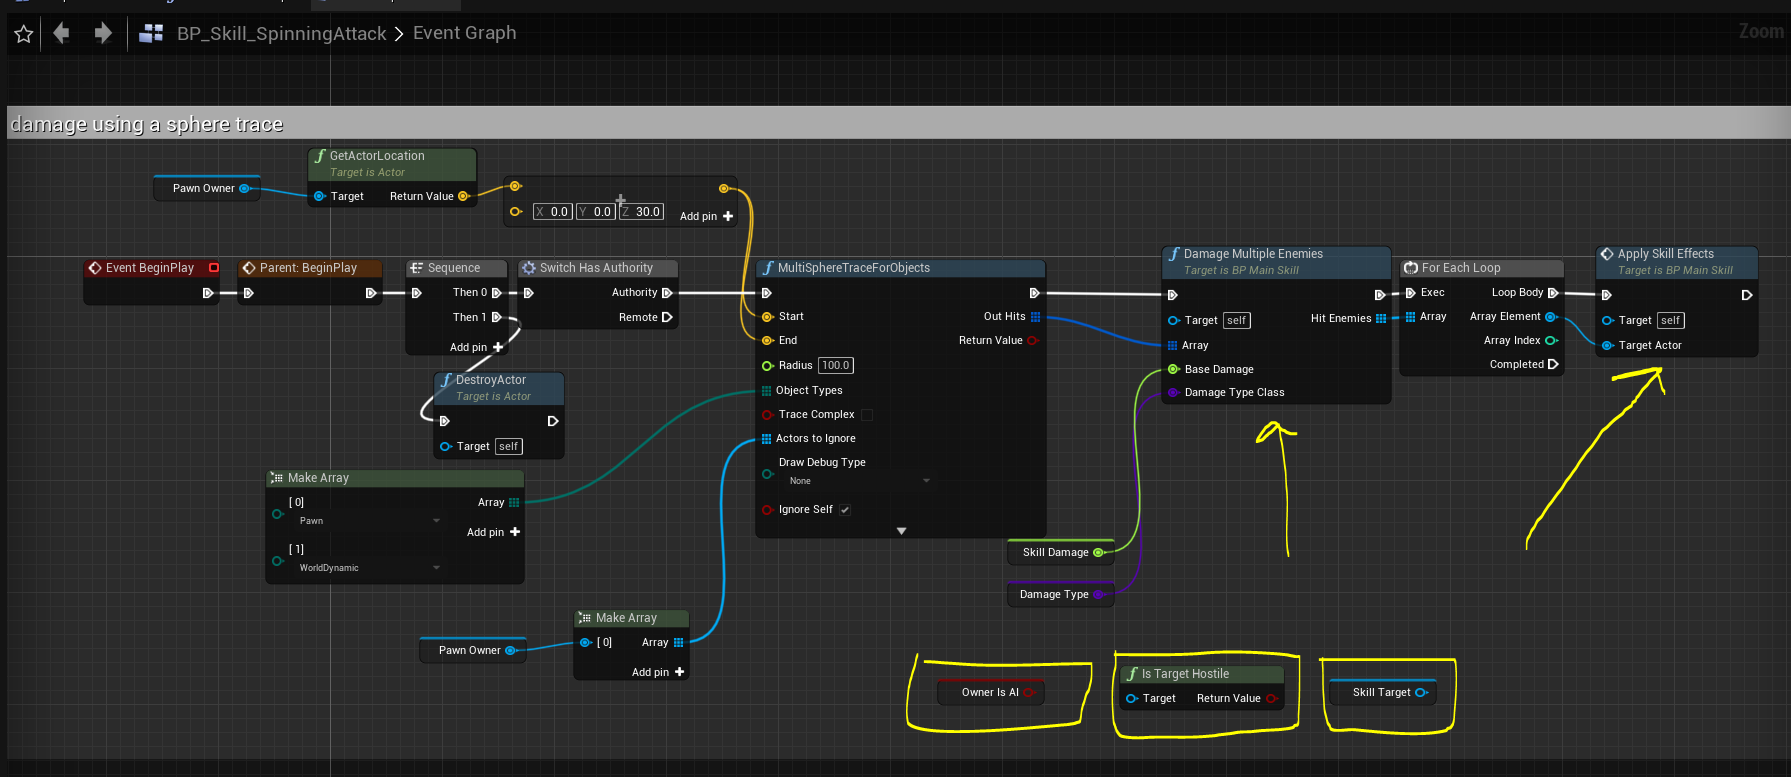
In this image you can see how we can setup a skill to apply damage, it is recommended to use trace by object and not by channel for tracing.
You can check if a target is hostile by using the IsTargetHostile function this ensures the skill owner only damages enemies, you can use the OwnerIsAI to see if the skill is executed by a player or AI, Damage Multiple Enemies can be used to take an array of hit from the trace, it automatically checks for hostility, and Apply Skill effects is used to apply effects indicated in the data table for example bleeding etc
We can also use Skill Target to access the targeted enemy, you can take a look at how the orb attack is setup to follow the target.
Let’s go ahead take a look at the Skill Tree and how we can set it up.
Inside Skills > Widgets > SkillTree you can see some examples of skill trees, if you want to create a new skill tree you can duplicate one of them and set it up the way you want, skill trees are dynamic.
Inside a skill tree we can indicate active and passive skills, active skills are indicated inside DT_Skills data table whereas passive skills are indicated in the skill tree widget, later we will see how to generate skill tree data to be used for the tree component later.
Inside the skill tree widget all of your skills need to be inside MainCanvas for everything to work as intended like lines since they’re created dynamically.
You can delete all existing skills and start from scratch if you want, or keep one to be duplicated, the skill widget is BP_SkillContainer.
Let’s take a look at how an active skill is added for example BasicAttack:
Type: Active.
Skill Tree ID: This is the skill ID from DT_Skills data table.
Supporting Skill: This is only used with passive skills, we will see it later.
IsActive: Set this to true if you want the skill to be available by default, if not the player will need to spend a point to activate it.
Parent Skill: This is the parent skill that BasicAttack is linked to in this case we have it empty because BasicAttack is the root skill and has no parent.
Required Level: is the player required level to be able to spend points and activate this skill.

Let’s now take a look at how a passive skill is created, in the details panel we have 2 sections, the first section is where we indicte the type as Passive, Skill tree ID is None because we don’t use a data table with passives, Supporting Skill this is where you indicate what Active Skill is supported, meaning if the passive skill adds additional benefits to the active skill like added damage or new effects etc, if the passive skill does not benefic an active skill like for example the player gaining additional stats then no need to indicate a supported skill.
Parent Skill: in this case we indicate BasicAttack as the parent skill and the link should be generated automatically.
Note: When adding new skills to the tree make sure you name them properly because Parent skill and supporting skill is asking for BP_SkillContainer so naming them will make it easier to select the proper one.

The second setting section for passive skills is this (image below), this is where you indicate what the passive skill does.
Passive Trigger Chance: the chance for that passive skill to trigger.
Skill Damage Boost: Added damage to the active skill for example 15 (15%)
DoSomethingElse: This is some indication of some other behavior you can access this inside the skill blueprint when spawned like we’ve previously discussed like the spinning attack blueprint.
Skill effects damage boost: this is added damage to effects such as bleeding damage.
Skill effects added movement: If the active skill slows down or boost movement speed then you can add more.
Skill effects duration increased: Add more to the duration of an effect.
New Added Effect section is for adding a new effect that the active skill doesn’t have for example applying fire damage when the active skill hits a target, you can also add movement speed buff/debuff and make a skill stun. Take a look at some of the skill tree examples to see how is that done.
Finally Character Added Stats: this is where you indicate if a passive skill adds stats to the character for example pure stats or things like crit chance, resistance etc usually a passive skill that adds stats to the player should not be supporting an activate skill, it is purely a passive skill that benefits the player.

Once you’re done setting up your tree you need to generate the server data.
Select the root of your tree widget like indicated below and you should see a section called Server Data, if you set Generate Server Data to true the GeneratedServerData array should be filled, you can see we have 23 array elements in the image, right click that array and select copy.
Leave AutoAssignUniqueID to true or indicate uniqueIDs yourself but make sure there are no duplicates.

Next open the player controller and select the BP_ClassSkillTreeCom component and in the settings section you can configure your classes here, you can see here for Class1 I indicated the skill tree widget, set the class to Class1 and here is where you want to right click on ServerTree and paste the data you generated from the skill tree.
The reason why we do this is because a server doesn’t use widgets so we need the skill tree to be generated as data for the server to properly utilize it.
You also have InitialActionBar where you indicate what skills are by default set in the actionbar.

This video was uploaded before the skill tree update but it shows how active skills are created.
AI & AI Skills
AI can easily be setup to perform multiple attacks with their own cooldown and conditions, AI can apply skill effects as well for example bleeding damage, and the same BP_MainSkill can also be used by the AI meaning that the player active skill blueprints can also be used by AI.
To create a new AI you can duplicate an existing blueprint or create a class out of BP_AI_Main.
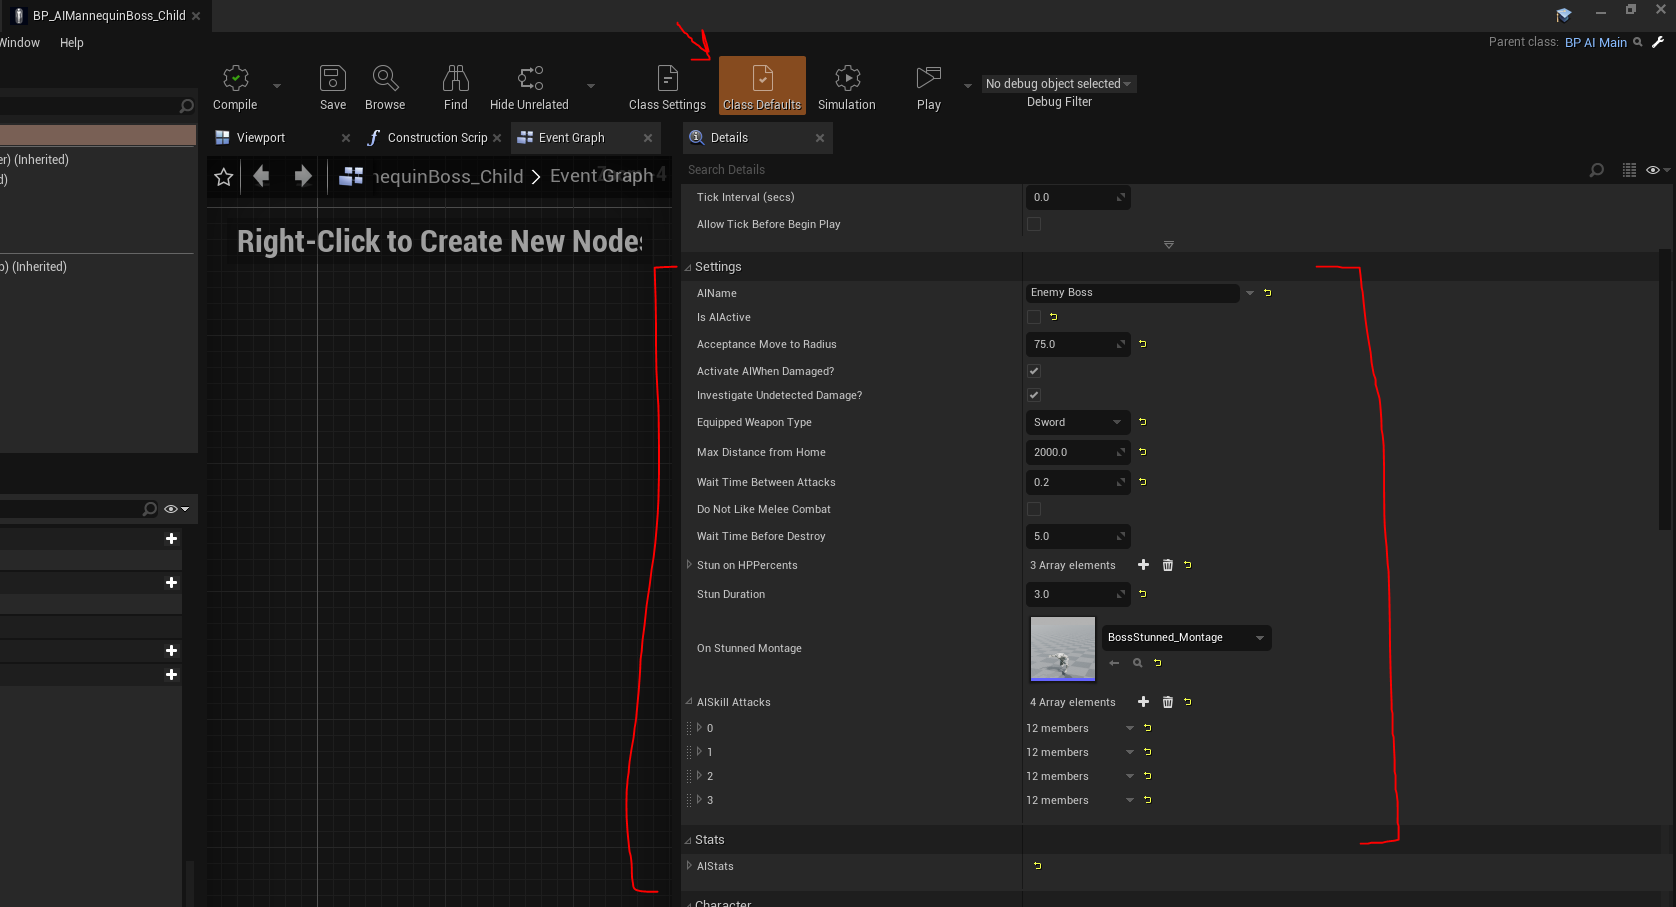
Open your AI bluerint and click on select defaults and you should see a Settings section
IsActive: Indicate if AI is active by default, if you set this to false you can call ActivateAI function anytime at runtime.
StunOnHPPercents: These are health percentages that the AI will be stunned at, this can be used in boss fight if you want the AI to be stunned once a certain health percentage is reached, StunDuration is the time the AI is stunned for, and indicate the montage to play when stunned, take a look at the montage example and make sure you have the same sections setup.
DoNotLikeMeleeCombat: This can be used with ranged AI so it tries to get some distance when you’re getting too close to it.
AISkillAttacks: here you can indicate the AI attacks, the settings are pretty straight forward, you can assign the same SkillBPToSpawn we use with the player skills. SkillEffects can also be sued the same way. Also for the montage make sure it has a montage notify where the AI should spawn the skill BP.

You can also set AI stats.

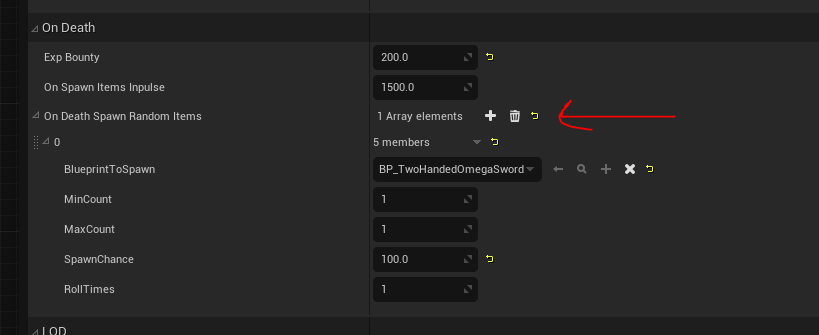
Also select what items to spawn when the AI is dead
BP_AIHome is the blueprint used as AI home, this blueprint is responsible for spawning and respawning the AI.
You can place it in the world and in the details panel select what AI to spawn and indicate the respawn time when the AI is dead and also set resapwn to true in order to enable AI respawning, BP_AIHome will act as the origin location for AI home.

If you have AI placed manually in the map then add BP_AIHome and select your AI then in the details panel you can look for AIHome and set it as the BP_AIHome for that AI using the pick tool like shown here:

Note: Don’t forget to set the Radius of the AI which is the distance from AI home that the AI will be able to patrol, also set the exp bounty in the AI class default, that’s the exp the player will receive when killing the AI.
Quest System
This quest system was added recently, it allows you to create interesting dialogues with skills and rewards, the quest creator widget allows you to create your quest easily by simply dragging and dropping dialogues and options.
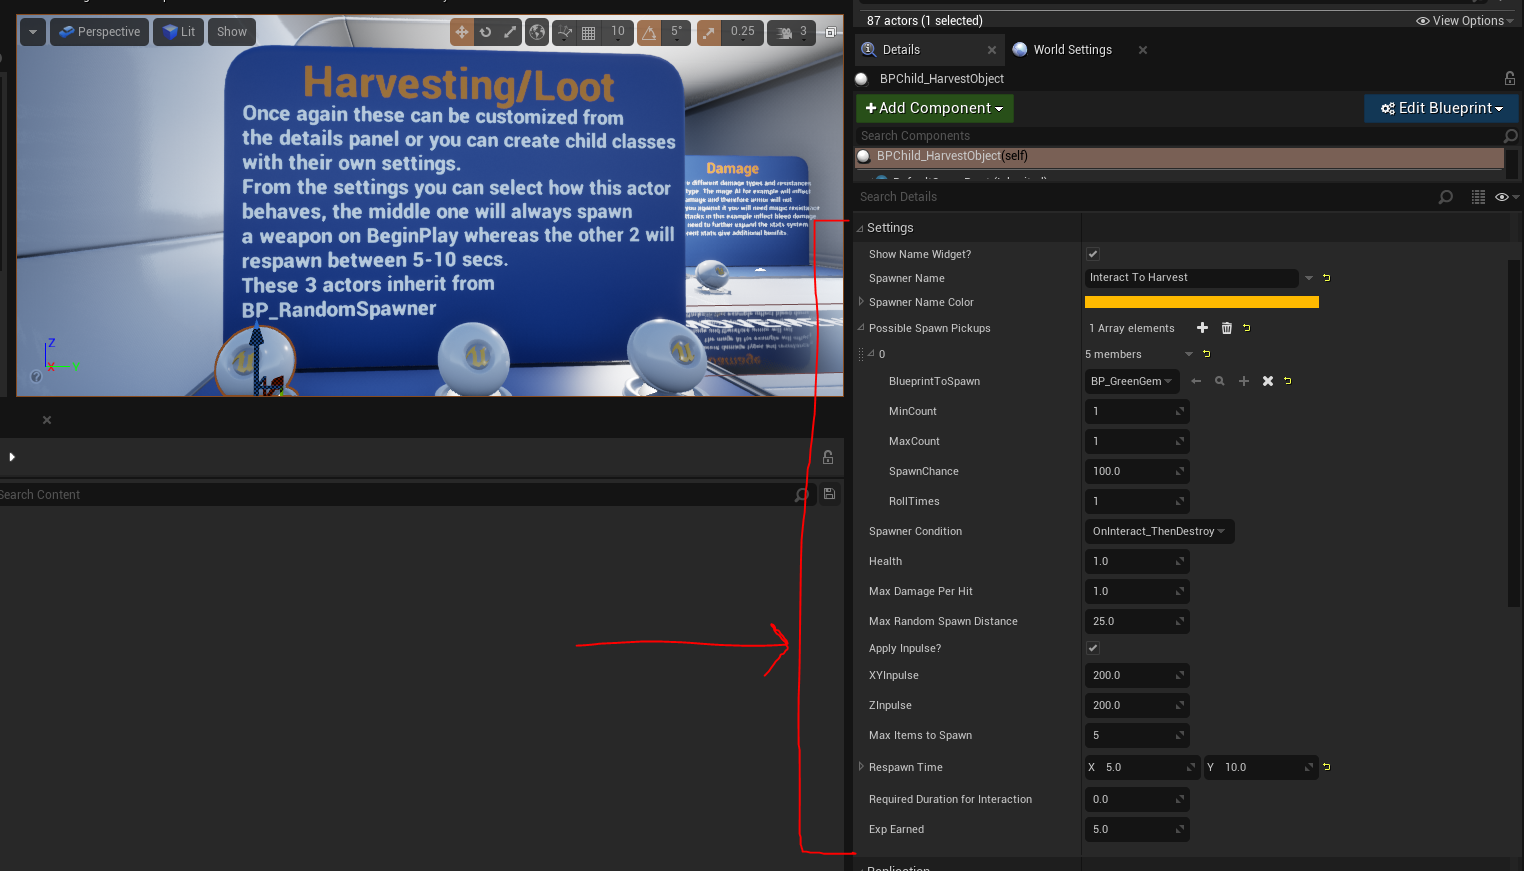
Pickup Spawner & Harvesting
You can use BPChild_HarvestObject to spawn items and indicate the interaction type (Spawn condition), you can take a look at the demo map to see how they’re setup from the settings in the details panel, alternatively you can create blueprint child classes and set them up by default.
Loot Container
Loot containers can easily be set from the details panel by indicating what items are inside the loot container and also set the column and row for how big is the container.

Crafting
Item recipe can be indicated inside the pickups data table for example Axe, we can indicate materials needed here, simply indicate the item ID of a material, items can also be part of a recipe such as a weapon.

Next create a child class out of BP_CraftingMain and indicate what items can be crafted here

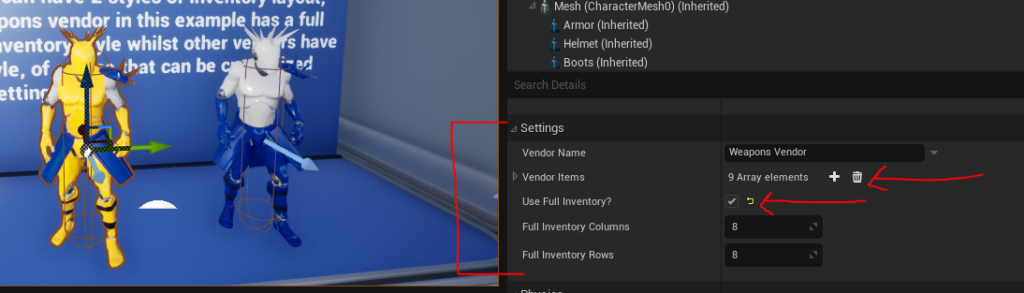
Vendors
Vendors are also setup the same way, the price is set inside the pickups data table and to create a vendor simply create a child class or duplciate an existing vendor and in Class defaults or in the details panel if placed in the world you can set these settings right here:
Equipment Mods
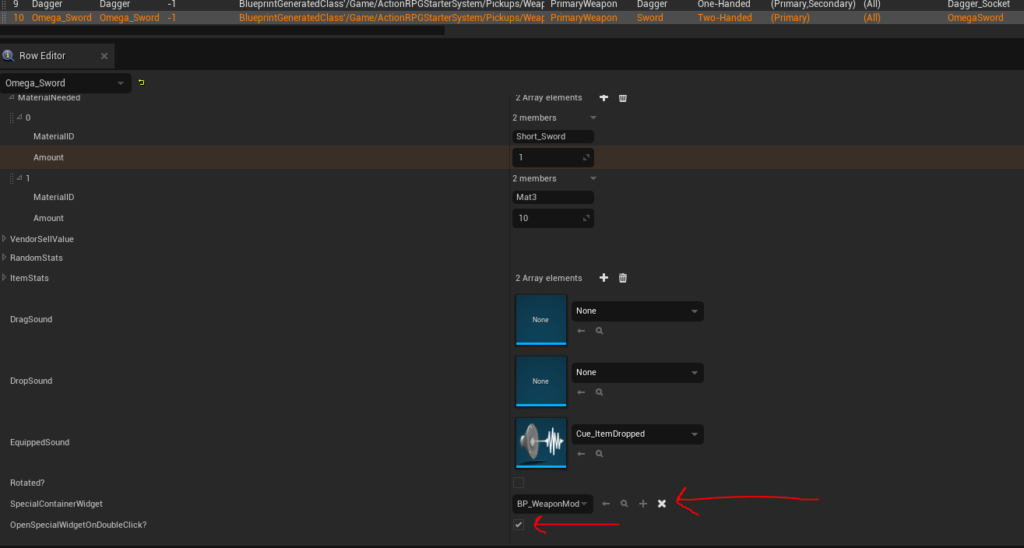
First create a new widget or duplicate BP_WeaponMod and add your containers, you can search for Jig Container in the palette and add as many as you need, select the container and set container type to EquipTo and columns and rows to 1 then indicate the supported items.

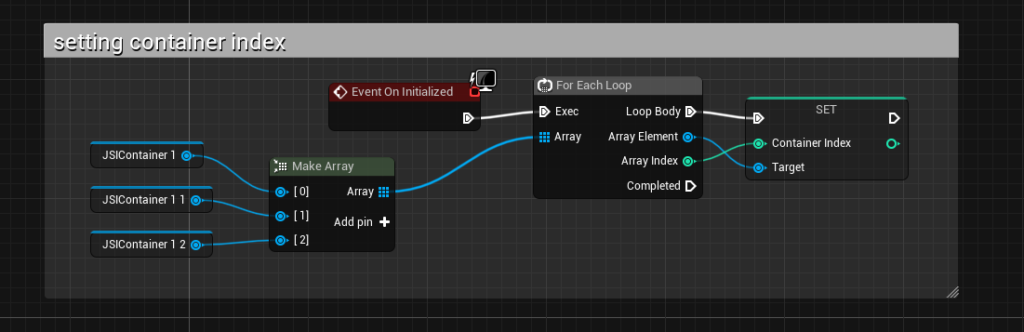
Next in the graph section set the container indexes like shown here
In class settings add BP_JSISpecialWidgetInterface interface to the widget, once you do that you should have GetListOfContainers function where you need to return all of your container references like shown here

Finally open the pickups data table and assign your special container here